

How To Do An Addreess Import For Avery Template
Template Tuesday Presents...how to use Mail Merge to create individual address labels.
This guide will explain how to use Mail Merge to combine a Word label template with a saved list of addresses to create individual address labels.
Before you start, you will need:
- A data source (your list of addresses). You can use an Excel Spreadsheet, Outlook Contact List, Office Address List, Word Data File, Access Database, or Text File.
- A label template. Ideally, you should use a compatible template that is built into Word. If your label size doesn't have a compatible code, you will need a saved copy of a suitable Word label template OR the measurements of your A4 labels. Word label templates and measurements for all of our label sizes can be found in our Label Templates section.
We recommend using Word's STEP BY STEP MAIL MERGE WIZARD and this guide will show you how to use the Wizard to create your set of address labels.
MAIL MERGE: START THE MAIL MERGE WIZARD
Open Word and create a blank document. Click on the MAILINGS tab at the top of the page. Click on START MAIL MERGE and select STEP BY STEP MAIL MERGE WIZARD.
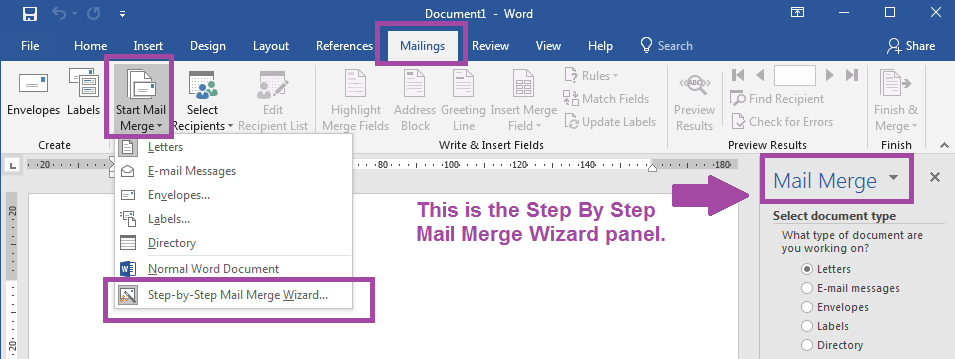
This opens the Mail Merge Wizard panel on the right hand side of your screen. This panel will guide you through the SIX STEPS of the mail merge. You will primarily use this panel to set up your address labels.
MAIL MERGE: STEP 1 – SELECT DOCUMENT TYPE
To create a set of address labels, you will need to select LABELS from the list of documents.
MAIL MERGE: STEP 2 – SELECT STARTING DOCUMENT
This is where you select your label template. As mentioned above, you can use a compatible template, a Word template you have previously downloaded and saved, or create a new label template.
Compatible Template – select CHANGE DOCUMENT LAYOUT and click on LABEL OPTIONS. Set "Printer Information" to "Page Printers" and choose your "Label Vendor" (e.g. A4/A5) and click OK.
Create A Label Template – follow the steps above but instead of choosing a code, click on NEW LABEL. This will open the LABEL DETAILS box. Fill in the measurements of your label size and layout, then click OK to create your label template. We've written a Template Tuesday guide to creating label templates, which you can view here.
Saved Label Templates – select START FROM EXISTING DOCUMENT and click on OPEN. Browse to your saved label template and open it.
MAIL MERGE: STEP 3 – SELECT RECIPIENTS
This is where you select your data source (list of addresses). You can use an existing list, saved Outlook contacts, or type a new list at this moment. To open an existing list, click on "Use an existing list", and then browse to and open your saved address list.
If your data source has multiple sections (e.g. a spreadsheet with two or more sheets), you will need to indicate which section contains your addresses. You also need to indicate if your data source has column headers (e.g. "Name", "Address Line 1" etc).
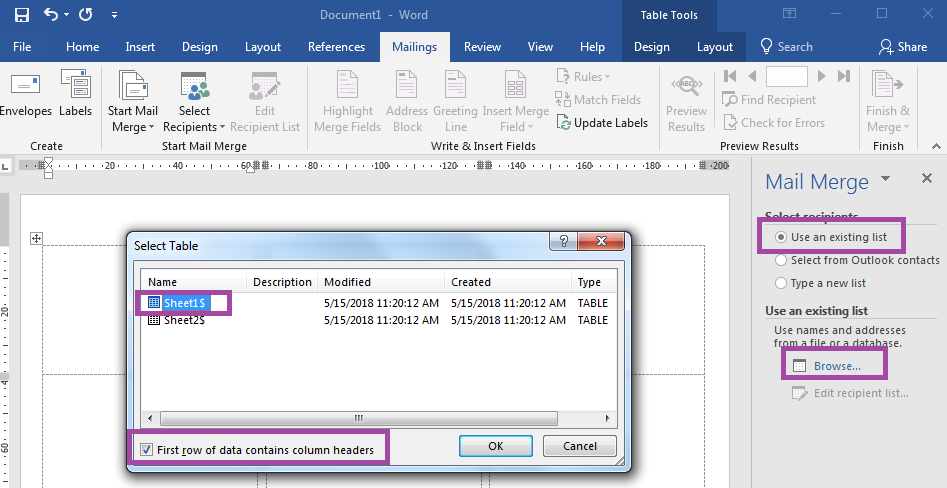
You will then be shown a list of the addresses that Word has found in your data source. You can use this box to sort and filter your addresses – and exclude any you don't want to use. Once you have confirmed your list of addresses, the NEXT RECORD rule will appear in all of the blank labels in your template (apart from the first one).
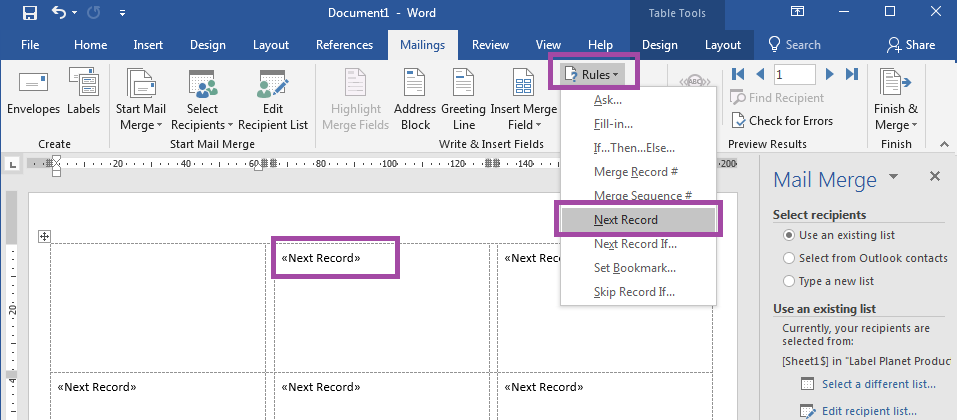
If you have used a saved label template, you will need to add in this rule yourself. Left click inside the second label. In the MAILINGS tab at the top of the page, you will see a RULES option. Click on this and select NEXT RECORD to add the rule to the second label. Repeat this for each of the remaining blank labels OR copy and paste the rule into the remaining blank labels. Remember to leave the FIRST LABEL blank.
MAIL MERGE: STEP 4 – ARRANGE YOUR LABELS
This is where you add your label design. We recommend adding your design to the first blank label and then using copy and paste to fill in the rest of your template. The Mail Merge Wizard Panel contains a tool (UPDATE ALL LABELS) to do this for you.
This option is NOT available if you have used a saved label template. If you need to use copy and paste to complete your label template, you must remember to make sure that you leave the NEXT RECORD rule in place.
When you want to add a piece of information from your data source, you need to add a placeholder to your design. The placeholders look like the Next Record rule but will have a name taken from the column headers in your data source – e.g. «column_header». The Mail Merge wizard includes preformatted options (like the ADDRESS BLOCK option) to add groups of placeholders. Alternatively, you can add individual placeholders using the MORE ITEMS option.

When building up your design you need to bear in mind that the information that replaces your placeholders may take up MORE OR LESS space once you complete the merge. You can preview your address labels in the next step (and go back and forth to make amendments as necessary).
If you do need to make changes, you can simply update the first label and use the UPDATE ALL LABELS option to update the rest of your template.
MAIL MERGE: STEP 5 – PREVIEW YOUR LABELS
The Wizard creates a preview of your finished address labels. Use this preview to make sure your addresses fit properly within your design (and on your blank labels) before you print.
We recommend scrolling through a few of your addresses. In particular, if you know one address is longer than the rest, check to see that this particular address fits neatly onto your blank labels.
If you find any problems, you can go back a step to amend your design. Alternatively, if just one or two of your addresses are problematic, use the EDIT RECIPIENT LIST option to alter those addresses.
MAIL MERGE: STEP 6 – COMPLETE THE MERGE
This step merges your label template and data source.
Before printing all of your address labels, we recommend doing a quick test print onto blank paper to make sure the alignment is correct. Click on PRINT and select the FROM option. Set the From/To values to reflect the number of blank labels on each sheet (i.e. if you have 21 blank labels per sheet, test print addresses 1-21).
You should also review your print settings. Make sure you select a "Labels" or "Heavy Paper" print setting. The page size must be set to A4 and use the media bypass tray (if your printer has one). Make sure no scaling options are selected (e.g. less than 100% or "Fit to…").
When you are happy with the alignment of your test print, load your blank labels into your printer, and print your address labels.
Next Week On Template Tuesday: Troubleshooting Tips – Word's Mail Merge Tool
How To Do An Addreess Import For Avery Template
Source: https://www.labelplanet.co.uk/how-to/template-how-tos/print-address-labels-using-mail-merge/
Posted by: gravestherymare48.blogspot.com
0 Response to "How To Do An Addreess Import For Avery Template"
Post a Comment